|
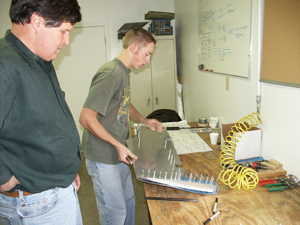
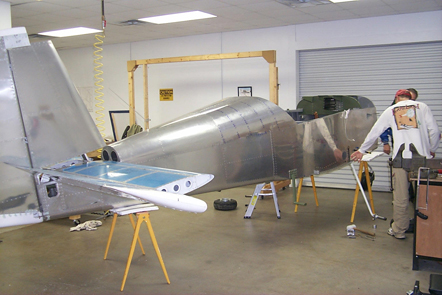
In the world of custom-built airplanes, building a sheet metal airplane is very popular. When one of the EAA SportAir workshops is scheduled in a particular location, the first workshop to fill up is sheet metal. People want to learn how to build using the tried and true methods of riveting pieces of metal together. Okaysheet metal construction is popular but isnt it difficult to do? The short answer is noassuming you acquire the basic knowledge and skills needed and have the proper tools. What about the toolsarent they expensive? They can be but as a general rule you can purchase the tools needed for a sheet metal project for less than $1,000. Of course, you can spend a lot more. There is no limit to the amount you can spend, as a matter of fact. Having stated that, there are tools that you will absolutely need and tools that will be nice to have. We will discuss both kinds and let you make the decision as to what you need and want to purchase.
Having the correct tools on hand before beginning work on your airplane is most important. The tools used in sheet metal construction are specially designed for this type of construction. New builders often become confused as to what type tools they need, how expensive they are, and where to purchase them. With that in mind lets take a closer look at sheet metal tools.
First of all, there is a tool you can purchase for every task required in sheet metal construction. Most kit manufacturers and aircraft designers will provide you with a list of necessary tools for their particular aircraft. Aircraft Spruce ® can also help you with the proper selection of tools. Some sheet metal aircraft utilize construction techniques that use nothing but pop rivets that are pulled using a small, inexpensive rivet tool. The tools required for this type aircraft are minimal. Other aircraft kits use regular structural rivets that must be squeezed or driven. A different list of tools will be needed for this type project.
Before listing the tools that you may need it is helpful to understand the basic steps of sheet metal construction. As these steps are presented we will develop a list of tools required to complete each phase.
The steps of basic sheet metal construction are as follows:
- cut the pieces of metal to size and bend if needed
- drill holes for rivets and cleco each hole
- disassemble the pieces
- deburr the holes
- countersink or dimple the holes
- prime the part -- if required
- reassemble the pieces together using clecos
- rivet the pieces together
Before analyzing the tools required for each step, the first item to purchase is some type of air compressor. Nothing elaborate is needed. You will need an air compressor capable of delivering 80-100 psi of air pressure. Your air compressor will be a primary piece of equipment. With most sheet metal projects you will be using a lot of air tools. Tank size is just as important as motor horsepower. The larger the tank the more volume of air stored. This means you will not deplete your air source as rapidly when you are using your pneumatic drill or a die grinder. Is an air compressor absolutely necessary? Not with all of the kits that are available for construction but I am going to assume that the average builder will want access to some source of compressed air. Air compressors come in all sizes and costs. They are really not that expensive and most builders will want to have one in their shop.
Measuring, Cutting & Bending
Most of the kit aircraft companies supply pieces that are precut. Occasionally you will be required to trim or cut sheet metal. Bending is another matter. Most bending required can be accomplished using small metal brakes, rounded wood, etc. The plans will often assist you in building the needed tool for bending. So, regarding tools, we can compile two different listswhat you really need and what would be nice to have. Understand that the lists of tools outlined are for a typical kit aircraft and do not necessarily apply to all makes and models. Use the list provided by your kit manufacturer as the basic guide.
Before we cut we must measure. The following tools represent a cross section of what is available for measuring and marking:
- steel rules
- edge marker blockthis tool holds a marking pen and has an adjustable stop for running along the edge of a piece of aluminum to mark it evenly.
- Sharpie markersyou should not use a pencil for marking aluminum. Use an ultra-fine sharpie marker.
- Protractor and depth gaugeused for making angle measurements and depth measurements.
- Scriberthese usually have two points one that is straight and the other bent. The points are made out of steel with an aluminum grip.
- Grip scaleused for measuring hole depths to determine the proper fastener length.
After measuring comes the cutting. The following tools are available for cutting sheet metal.
- metal snipsthese tools are usually called offset metal snips and are available for left hand, right hand, and straight cuts. The blades of the snips are offset allowing sheet metal to be cut straight or in a circle keeping the material away from your hands. The handles are color coded with red meaning they will cut straight and to the left and green meaning the snips will cut straight and to the right.
- Combination snipsthis tool is made for straight, left, and right hand cuts. They are made of aluminum and are light in weight.
- Air powered metal sheara pneumatic tool that will cut up to 18 gauge metal with very little distortion of the metal. Most of these remove about ¼ inch of material. Long, straight cuts of aluminum are simple with one of these tools. Cost is usually less than $100.
- Hole cutters and circle cutters are available for cutting circles, etc.
- Hand nibbling tools are useful for cutting holes, notching metal, and trimming. They can be purchased as hand tools or pneumatic powered.
- Die grinders are used by many builders for cutting, grinding, and polishing. A cutting wheel can be used along with several other useful attachments. Die grinders require a lot of care when using to prevent accidents.
- Large foot shears and some portable shears are very useful for cutting sheet metal. Some of these are expensive. These tools are not necessary but nice to have. A large foot shear will cost anywhere from $1,000 to over $2,000. They are manufactured for different cutting widths with the most common being 37 or 52 meaning they will shear a piece of metal that wide. If you do not want to spend the money on a permanent tool such as this there are smaller shears available. They are usually combination shear, brake, and slip roll machines that are much smaller in size and less expensive in cost. The maximum width of cut will be anywhere from 12 to 30 with a cost of less than $300. Some method of cutting with a shear will be very useful for the sheet metal builder.
Bending tools are very helpful. Some of the more popular tools used for this purpose are:
- Hand seamerthis particular tool is used like a hand held brake. You can bend small flanges, bend tabs, etc. with a hand seamer. The jaws should have a radius on their edge so you dont bend too sharp of a radius on the metal. Most hand seamers available for welding or duct-work do not have this radius.
- Fluting pliersthese are used to straighten rib flanges and to form curved stringers. When squeezed over the metal a small area of metal is pushed down while adjacent metal is pulled into the bend. This action can actually form a curve. Fluting pliers are recommended by several kit manufacturers and may be purchased for less than $30.
- Metal shrinker/stretcher will actually shrink metal for inside angles and stretch metal for outside angles. It is one unit with interchangeable jaws for either stretching or shrinking.
- Sheet metal brakesthese tools are designed to bend metal. One type found in many shops is a hand brake capable of bending metal up to 48 wide. This tool is available from several different sources at a cost of around $500. It is very useful for metal work. Two types are sold. One is a straight hand brake that bends an entire piece of metal and the second type is called a pan and box brake. The latter allows more flexibility in metal forming by removing or positioning metal fingers allowing you to only bend a portion of a piece of metal rather than the entire piece. I would recommend purchasing this type if you are going to spend the money. Smaller hand brakes are available at prices of $50 to $200. These will only bend smaller pieces of metal from 12 widths to about 24 widths.
- Slip rollersused to bend a piece of metal into a curve. A useful tool but certainly not necessary for the average homebuilder.
Drilling and Assembling Metal Parts
The next step is to drill holes for the fasteners used in sheet metal constructionrivets. Holes are drilled and the pieces temporarily held together for proper fit and alignment. Several tools are needed for this step.
- Air drills are the most common type of drill used with sheet metal construction. Some of the more simple kits may be constructed using an electric drill of some sort but the majority of builders will want to purchase a pneumatic drill. One of the most important considerations with an air drill is to ensure the one you purchase has a variable throttle for good control through all speeds. You will want to use slow and faster speeds for different types of drilling. A ¼ inch drill or a 3/8 inch drill are the most common for this type of construction. Right angle air drills and flexible drill attachments are made for those hard to reach drilling challenges.
- Drill bits come in all sizes and kinds. Cobalt drills are very common. Drills are referred to by a number size that corresponds to a decimal equivalent in inches. It is advisable to purchase split point drills for best results on sheet metal. These drills will drill much easier without moving across the metal and leaving a scar. During original installation, rivet holes are drilled slightly larger than the rivet diameter. When properly installed and driven, the rivet will expand to fill the hole. You will usually encounter a 3/32 or 1/8 inch diameter rivet. Drill sizes for a few different rivet sizes are as follows:
Rivet Diameter
3/32
1/8
5/32
3/16 |
Drill Size
40
30
21
11
|
You can purchase drill sets with most of the drill sizes included or purchase drills individually. Be sure you get a good quality drill.
- Drill stopsthese are used when you are drilling in sheet metal to prevent drill breakage and surface marks on the metal. They have a coiled spring that will stop the drill chuck from hitting the work surface.
- Unibitthis is a specially designed bit designed to drill larger holes in material. They provide a range of hole sizes usually from 1/8 to ¾ inch. One bit will drill several size holes.
As we are drilling holes we need to find a way to hold the pieces of metal together temporarily for proper fit. That is where the word Cleco comes into play. A Cleco is a small metal holder that is installed in a rivet hole to temporarily fasten two pieces of metal together prior to riveting. You are going to need a large amount of clecos, often 500+. They come in different sizes so be sure you check your manual for the proper ones. Clecos are color coded as follows:
Hole Size
3/32 (#40)
1/8 (#30)
5/32 (#20)
3/16 (#11) |
Color Code
zinc
copper
black
brass
|
Clecos are installed using a special type of plierscleco pliers. A pneumatic installation tool is also available for installing clecos. Have a couple of pairs of cleco pliers around, as you will use this tool regularly.
Other types of clecos are side grip cleco clamps and wing nut clecos. The side grip clecos are used to hold material together without holes being drilled. Wing nut clecos are designed to pull pieces of metal together by their gripping action.
We will follow up with an additional article on sheet metal tools. Trying to come up with a list of tools for your sheet metal project can be somewhat confusing. Hopefully, our discussion will help you make a list of what you need to get started. You can always add to your inventory as you go along.
|
