Aircraft Spruce & Specialty Co.

27 Years Of Determination - Nx115Rx Aircraft Story
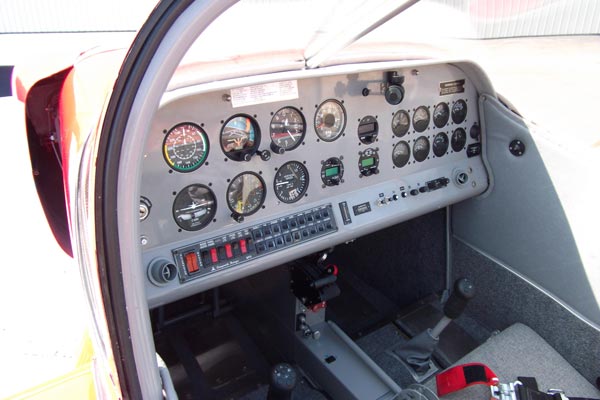
27 Years of Determination - NX115RX I knew when I fully retired, if there is such a thing, that I wanted an airplane to occupy my spare time with its infinite joy, experiences and occasional trouble shooting challenges, but first I needed to find that airplane. Early in 1984, I happened upon an aviation article describing a folding wing aircraft that you could trailer to and from the airport and Gus Gordons Thorp S-18 was that airplane in the article. It had everything I wanted. Speed, 2 place, holds a reasonable amount of baggage and with a standard fuel load, about 3 hour legs and of course I could keep it at home. I dont recall what hangar rent was going for in the San Diego area at the time, but I knew by the time I had the aircraft built, that rent was going to be very expensive, so the Thorp S-18 with folding wings seemed to be the logical choice for me. So from the information in the article, I ordered a set of plans in September of 1984, not knowing it would take me 27 years until the aircraft would have its first flight on the 3rd of April 2011 at Brown Field in San Diego, California. At about this same time I joined the T-18 Mutual Aid Society, a group of Thorp builders that shared building ideas/challenges and posted items for sale in their want ad section. This is where I happened upon a partially completed S-18 project. The basic fuselage was done and it came with an assortment of formed ribs, beams, brackets and several rolls of .032 aluminum skins and a list of other miscellaneous items. The only problem was this project was located in Addison, Texas and I was in San Diego California. So I boarded a commercial flight to KDFW and rented a U-Haul truck and drove to Addison to pick up the project from Dick Cavin. Once loaded I headed West and figured it was an approximate 27 hour drive, stopping only for fuel, food and an occasional pit stop. This journey across the Texas pan handle and through New Mexico and Arizona would have been a little easier if the U-Haul truck had air conditioning and an automatic transmission, but that would have made it a vacation and not an adventure! All was going well until I reached the Arizona and California border and had to stop at the agricultural station for inspection. The young lady at the check point asked me what I had in the back of the truck. I replied An airplane Maam! It was obvious to her that I had something in the back of the truck other than an airplane and she smartly ask me to open the back of the truck. The expression on her face (much like a politicians) did not change and seeing that I did not have any contraband or other illegal cargo she told me I was free to go. I was on the home stretch now and exactly 27 hours after leaving Addison I was in my driveway. Now the real work was just beginning No one can begin to tell you how big a challenge it is to build an airplane. It would be akin to your first arrested landing on an aircraft carrier, in my case CV-16 in 1977, there are no words to explain the process other than it is a lot of hard work to get there. I had a partial project with a bunch of unassembled parts, a set of plans, a large workshop, plenty of tools; now all I needed was time to put it all together. The only obstacles in my way were the U.S. Navy, being a new hire at the Airlines, and moving to a new house. Once off active duty, I The basic plans built A/C was pretty bare on the inside meaning it had no creature comforts other than seats. No upholstered side panels, no carpet and just a basic instrument panel. Heat and fresh air sources were also optional. This would not do as I was accustomed to the creature comforts of larger aircraft I have flown over the years. Adding these extras would of course add time to the building process as well as requiring more money in the budget. It was felt that adding these extras now during the building process would in the long run save both time and money. The first consideration was the panel and what to put in it. As I will be a VFR machine I chose an all electric panel, meaning no vacuum pump, regulator, hoses and filter, saving weight and space. The ADI, DG and T & B are electric. The Micro Air package was used (Radio/transponder/intercom) all prewired with a plug and play harness. A TruTrak 2 axis autopilot was also installed. All engine gauges are electric, meaning no fluid/pressure lines in the cockpit. The exception to this being the fuel tank to fuel valve to firewall fuel line. The only other additions to the panel were the remote ELT test/reset switch, RAC trim indicators, HOBBS meter and a cigarette plug adapter (for warming in flight meals)!
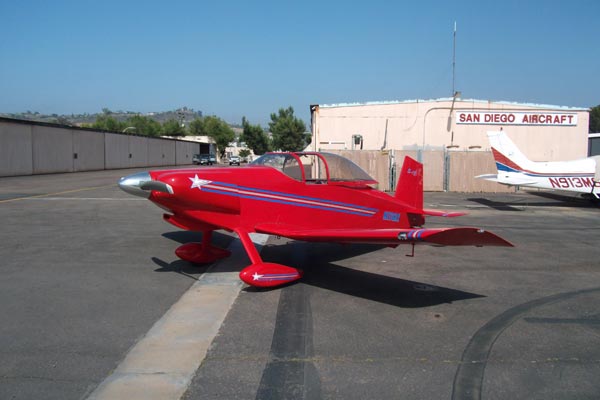
Now that the panel was pretty much complete, it was time to work on what I call the fuel management and environmental control console. I did not like the idea of using 3 different push/pull controls (Vernier type) for the engine and having started my training in a Piper Cherokee with a throttle quadrant and having a quadrant in the larger transport aircraft I flew, I felt more comfortable having that type of setup, but the only problem was I could not find a small enough of a unit through a supplier so I needed to build one to fit the space and my requirements. I knew the basic design I wanted and after about 2 months of R & D and several prototypes, I ended up carving the housing out of a block of solid acrylic. The 3 levers one for the throttle (black), one for the mixture (red) and one for carb heat (silver) took several more weeks to get the right length, bend and throw. I also designed the unit to use the same part number control cables of the same length. The unit fits nicely on top of a housing that also holds the Andair fuel valve, guarded switch for the primer solenoid and the two push/pull controls for cockpit fresh air and heat and the rocker switch for the electric rudder trim. It is a lot of monkey motion installed in a small space, but it enables me to control everything with the right hand (while keeping the left hand on the stick). Speaking of the stick it has aileron, elevator, PTT, radio freq. flip/flop and auto pilot CWS (control wheel steering) switches in the grip. I then dressed up the interior with some marine grade carpet (over insulation), S/S skid plates on the floor and covered some panels with vinyl to install on the sides of the cockpit. A baggage compartment was also installed to carry the necessary RON items. The day came when 99.9% of the construction was finally complete and it was time to trailer the A/C to Brown field for the first flight. As you can imagine there were a few turned heads and puzzled looks on the road as I headed to the field. The first flight went as advertised and the aircraft returned safely to Earth after 45 minutes with all its parts and the test pilot (me) satisfied that 27 years of building had come to a well deserved conclusion. The Thorp S-18/T-18 is a great airplane and performs as well as the other homebuilts in its class for about half the cost. If you want additional information on the Thorp S-18/T-18 you can go to our Forum site and find comparison performance information on the Thorp, RV and Mustang II aircraft. The Forum site also has a photo album and a great reference library should you have any questions. Google T18.net and click on Forum. Now its time for flying to points East for some $300 hamburgers and start my next project .restoring my 1969 MGB that I bought in 1970. Rich and Sil Brazell... plus Scooter |
 immediately joined a Naval Reserve squadron (the same one I had been with as an active duty pilot) and now faced having to divide my time between the airlines (commuting to my East Coast base from San Diego) and giving at least 3-4 days per month to the Reserve Squadron. This left virtually zero time to work on the project and almost no time to do house related projects. The only available time to do aircraft related stuff was vacation time and that was not near enough. When I did find some valuable time to bend metal and buck rivets it was suggested that I start with the rudder as it was purported to be the most complicated part on the aircraft to construct due to its series of bends the skins required and also the difficulty in riveting the entire control surface together, so I started there. The Thorp was designed using machined hole tooling which meant no jigs were required and if proper placement of the rivet hole locations were made, one could simply drill holes at the proper locations and it would all line up correctly when clecoed together. For the most part this was true, but it still was a learning curve, especially with me using new metal working tools like a brake, drill motor and a rivet gun and bucking bars. Along with this learning meant there were mistakes and I am sure every new home builder has a pile of mistakes that constitute misdrilled holes, incorrect bend lines, improper rivet setting and a list of four letter words I cannot use. In spite of several of these afore mentioned setbacks the rudder was finally completed and it was time to move on to another section of the aircraft.
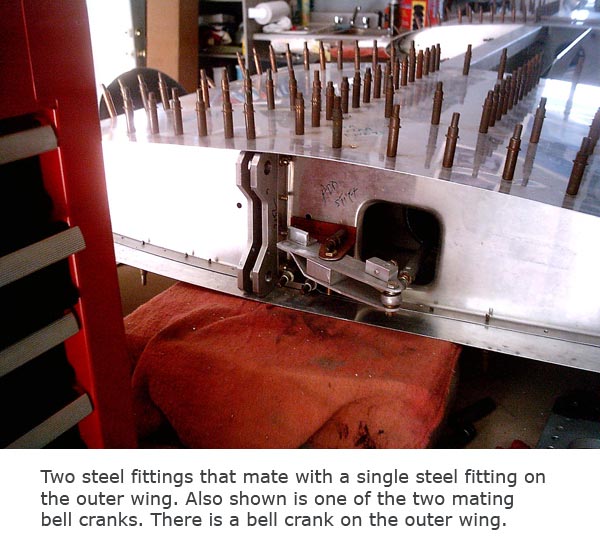
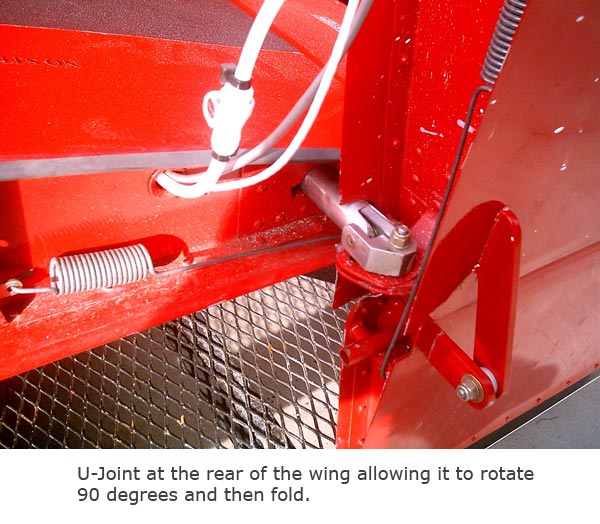
There were days when assembly of the aircraft went very smoothly and then there were days when I should have not gone in the workshop. A true case of two steps forward and one step back. A good day to watch the San Diego Chargers on TV! For reasons unknown to me, a rather simple building procedure (making a small bracket) would turn into an all day process, where a more complicated assembly or part making process would zip right along; a good example of this is the folding wing mechanism. The heart of the S-18, this system of double bell cranks (one on the inner wing that mates with one on the outer wing when in the flight position) and hardened steel wing fittings along with a swivel U-joint at the rear of the wing make this aircraft a good investment to take home rather than spend thousands of dollars a year on hangar rent.
In San Diego a hangar can run $500 month
$6,000/yr! That chunk of change pays for a lot of fuel, maintenance and insurance. It was a battle to stay focused and maintain quality control even if it meant making four of the same part until I got the just right part called for by John Thorp on his drawings. This might be a good time to touch on the JTs (John Thorps) hand drawn engineering prints. Yes, I said hand drawn, not computer generated. Remember this aircraft design was developed back in the early 60s and there was no such thing as CAD (Computer Assisted Drawing) so all the nearly 200 + drawings were done on a drafting table with a T-Square and pencil. It took a little work and with the help of a good friend at Gillespie field (Mr. John Kerr who has built 3 T-18s!), I was able to sift through a few problem areas on the drawings. What also helped was that most of the drawings were either full size or half scale. Using the full size drawings (for example a flap hinge) meant I could make a copy at KINKOs , cut the drawing to the line and then transfer the template to the raw stock and using a metal band saw cut the part and shape it (as required) with a disc/belt sander.
immediately joined a Naval Reserve squadron (the same one I had been with as an active duty pilot) and now faced having to divide my time between the airlines (commuting to my East Coast base from San Diego) and giving at least 3-4 days per month to the Reserve Squadron. This left virtually zero time to work on the project and almost no time to do house related projects. The only available time to do aircraft related stuff was vacation time and that was not near enough. When I did find some valuable time to bend metal and buck rivets it was suggested that I start with the rudder as it was purported to be the most complicated part on the aircraft to construct due to its series of bends the skins required and also the difficulty in riveting the entire control surface together, so I started there. The Thorp was designed using machined hole tooling which meant no jigs were required and if proper placement of the rivet hole locations were made, one could simply drill holes at the proper locations and it would all line up correctly when clecoed together. For the most part this was true, but it still was a learning curve, especially with me using new metal working tools like a brake, drill motor and a rivet gun and bucking bars. Along with this learning meant there were mistakes and I am sure every new home builder has a pile of mistakes that constitute misdrilled holes, incorrect bend lines, improper rivet setting and a list of four letter words I cannot use. In spite of several of these afore mentioned setbacks the rudder was finally completed and it was time to move on to another section of the aircraft.
There were days when assembly of the aircraft went very smoothly and then there were days when I should have not gone in the workshop. A true case of two steps forward and one step back. A good day to watch the San Diego Chargers on TV! For reasons unknown to me, a rather simple building procedure (making a small bracket) would turn into an all day process, where a more complicated assembly or part making process would zip right along; a good example of this is the folding wing mechanism. The heart of the S-18, this system of double bell cranks (one on the inner wing that mates with one on the outer wing when in the flight position) and hardened steel wing fittings along with a swivel U-joint at the rear of the wing make this aircraft a good investment to take home rather than spend thousands of dollars a year on hangar rent.
In San Diego a hangar can run $500 month
$6,000/yr! That chunk of change pays for a lot of fuel, maintenance and insurance. It was a battle to stay focused and maintain quality control even if it meant making four of the same part until I got the just right part called for by John Thorp on his drawings. This might be a good time to touch on the JTs (John Thorps) hand drawn engineering prints. Yes, I said hand drawn, not computer generated. Remember this aircraft design was developed back in the early 60s and there was no such thing as CAD (Computer Assisted Drawing) so all the nearly 200 + drawings were done on a drafting table with a T-Square and pencil. It took a little work and with the help of a good friend at Gillespie field (Mr. John Kerr who has built 3 T-18s!), I was able to sift through a few problem areas on the drawings. What also helped was that most of the drawings were either full size or half scale. Using the full size drawings (for example a flap hinge) meant I could make a copy at KINKOs , cut the drawing to the line and then transfer the template to the raw stock and using a metal band saw cut the part and shape it (as required) with a disc/belt sander.